Our Location
304 North Cardinal St.
Dorchester Center, MA 02124


A bot can hammer your WordPress login page with thousands of username and password combinations, and WordPress won’t push back once. There’s no built-in limit — every attempt just goes through.
That’s not something you’re missing in your settings. Rate limiting was simply never built into WordPress core, which is exactly why brute force attacks remain one of the most common ways WordPress sites get compromised.
Adding a login attempt limit closes that gap and turns an unlimited attack surface into a dead end. This guide shows exactly how to set it up with BruteFort, plus the thresholds worth using for your site’s risk level.
Quick Answer: Install BruteFort, go to Settings → Rate Limit Settings, and set Max Allowed Attempts to 5 and Time Period to 30 minutes — the defaults that work for most sites. Click Save and the limit is active immediately, no code required.
A login attempt limit — also called rate limiting — watches how many failed login attempts come from a single IP address within a defined time window. Once the threshold is crossed, that IP is locked out from the login page for a set period.
The effect on a brute force attack is immediate. A bot that could try hundreds of passwords per minute is suddenly limited to 5 attempts every 30 minutes. At that rate, cycling through even a modest credential list would take years. Most attack bots move on to easier targets the moment they hit a rate limit.
Rate limiting also protects against credential stuffing attacks — where real leaked username/password pairs from data breaches are tried against your login. Even targeted attempts using real credentials are slowed to the point of being impractical.
BruteFort is a focused WordPress brute force protection plugin that handles rate limiting, login lockout, custom login URL, and IP management from a single settings panel. Install it from your WordPress dashboard under Plugins → Add New and search for BruteFort, then activate it.
Once active, go to BruteFort → Settings → Rate Limit Settings. You’ll see three fields to configure:
{{locked_out_until}} variable to insert the exact time the lockout expires.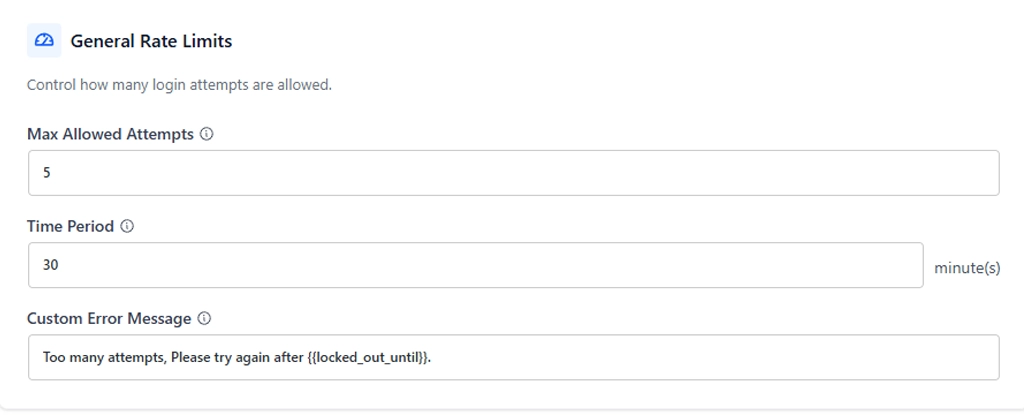
Click Save and rate limiting is active immediately. No code changes, no server configuration.
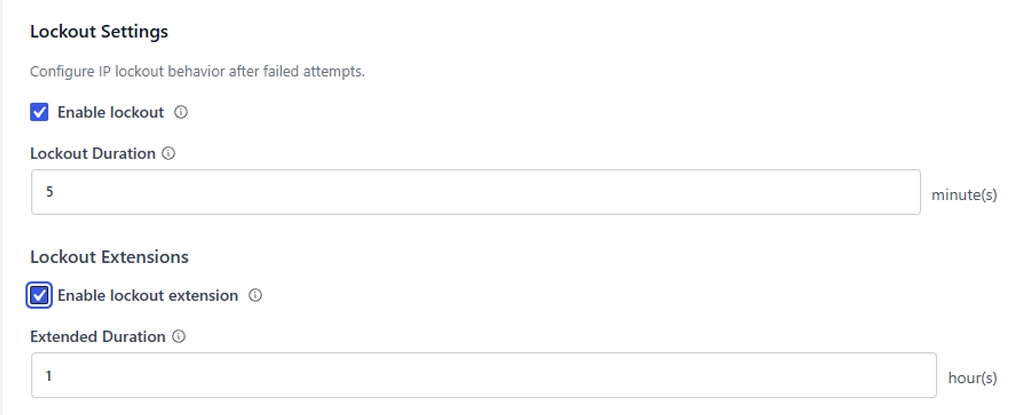
BruteFort also has a dedicated Lockout Settings section where you can enable WordPress IP lockout after failed logins — a more persistent block for IPs that repeatedly trigger rate limits. This is useful for IPs that keep coming back after each temporary lockout expires.
The Logs section in BruteFort records every lockout event with the IP address, failed attempt count, current status, and timestamp. This is your audit trail — if you’re seeing the same IP triggering lockouts repeatedly, you can move it to a permanent blacklist from the IP Settings tab.
With aggressive rate limiting in place, there’s a small risk of accidentally locking yourself out if you mistype your password several times.
Pro Tip: Whitelist your own IP address before enabling strict limits. Go to BruteFort → Settings → IP Settings, select WhiteList from the dropdown, enter your IP address, and click Add. Whitelisted IPs are exempt from rate limiting entirely.
If you don’t have a static IP, consider whitelisting the IP range your ISP typically assigns to you, or use BruteFort’s Custom Login URL feature alongside rate limiting — a custom, unpredictable login slug means bots never even find your login form, reducing the chance of legitimate mistype lockouts.
For most WordPress sites, 5 attempts per 30 minutes is the right starting point. It’s strict enough to stop automated attacks cold while still accommodating a real user who genuinely misremembers their password a few times.
For higher-security sites — WooCommerce stores with customer payment data, membership sites, or any site where admin compromise would be especially costly — 3 attempts per 60 minutes is a reasonable tightening. Make sure your own IP is whitelisted before making the limit more aggressive.
No. WordPress has no native rate limiting on login attempts. Without a plugin or server-level configuration, a bot can attempt to log in an unlimited number of times without any automatic response from WordPress. This is one of the most commonly exploited gaps in unprotected WordPress installations.
They’ll see the custom error message you configure — which with the {{locked_out_until}} variable tells them exactly when they can try again. The lockout is temporary and lifts automatically after the time period expires. For site admins, whitelisting your IP prevents any chance of accidental self-lockout.
Rate limiting is the most important layer, but it works best in combination with a custom login URL. BruteFort’s Custom Login URL moves your login page away from the default /wp-login.php path, making your site invisible to bots that specifically target WordPress sites. Together, rate limiting and a custom login URL eliminate the vast majority of automated login attack traffic.
Yes. BruteFort’s Logs screen shows every lockout event with the triggering IP, number of failed attempts, current status (locked or expired), and the timestamp. You can search by IP address and filter by date. IPs that appear repeatedly can be permanently blacklisted from the IP Settings tab.
Limiting login attempts is the most effective single improvement you can make to WordPress login security — and it takes about two minutes to configure. BruteFort handles rate limiting, lockout logging, IP whitelisting and blacklisting, and custom login URL from a single free plugin.
You might also like:

